
How To Fix Windows Update Install Error 0x80070643
Windows Update error code 0x80070643 has been around for a while, but it recently gained attention when users started encountering it while installing updates such as KB5034441, KB5037849, KB5037768, and others.
In this troubleshooting guide, we’ll cover all the details and provide possible solutions to fix the Windows Update install error 0x80070643.
Error’s details:
You may receive different types of text error message that includes the error code 0x80070643. Some of them are given below:
There were some problems installing updates, but we’ll try again later. If you keep seeing this and want to search the web or contact support for information, this may help: (0x80070643).
0x80070643 – Fatal error during installation.
0x80070643 – ERROR_INSTALL_FAILURE
Download error – 0x80070643
Affected OS version: – Windows 10, version 21H2 and 22H2
Receiving this error code means that the KB file failed to install, and you need to try again after fixing the issue. While it can be challenging to find the exact fix on the first attempt, you should keep trying the subsequent solutions to resolve Windows Update Install Error 0x80070643.
If you are encountering this error while installing Windows update KB5034441, you either need to increase the recovery partition size by 750 MB or more, or you need to hide this update if you are not using BitLocker.
How to Remove 0x80070643 Update Error on Your Computer
Different PCs may have different reasons for encountering this error, so it is not possible to identify a specific cause for all users. However, I have listed the solutions from the most to the least prominent.
Before diving into the fixing guidelines, it is recommended to prepare your PC with the following steps:
- Fix common errors on the PC.
- Resolve any missing system files issues.
- Update the drivers.
- Scan for malware.
- Fix registry issues.
These issues can significantly contribute to the Windows Update Install Error 0x80070643. Before applying deeper troubleshooting methods, optimize your PC by addressing these problems.

#1 PC Optimizer Tool
- ✅Solve more than a hundred of the most common PC issues
- ✅ Optimize Windows and Boost Windows Performance.
- ✅ Clean Disk Space
- ✅ Privacy Protection
- ✅ Protect PC by resolving common vulnerabilities
- ✅ Real Time Boost
- ✅ Real Time Privacy
- ✅ Smart File Removal
Solutions:
- Restart your computer.
- Reset Windows update components.
- Install updates manually.
- Hide problematic updates.
- Add 250 MB more space in Recovery Partition.
- Clear the Software Distribution Folder.
- Update/Repair/Install .net framework.
- Install updates in Clean Boot Mode (to avoid software and driver conflict)
- Run System File Checker Tool.
- Run DISM command line utility.
- Check Disk for errors.
- Restart Windows update service.
- Use Windows update assistance.
- Re-register Windows Installer Service
- Run Windows update troubleshooter or Get Help to fix this error.
- Turn off Security software temporarily.
- Repair Windows Installation.
Solution 1: Restart your computer.
Sometimes, background processes can interfere with the Windows update process. Restarting your computer stops these processes, allowing your PC to download and install updates again.
Solution 2: Reset Windows update components
There are several components related to Windows Update, such as the Distribution Folder, Catroot2 folder, and the Windows Update service. You can reset these components in a few different ways: running the Windows Update troubleshooter, which analyzes and resets necessary components only, using a simple command to reset essential parts, or opting for a complete manual reset of the Windows Update components.
Simple Reset:
Step 1: Open command prompt as Administrator.
Step 2: Execute the following commands:
net stop wuauserv
rd /s /q %systemroot%\SoftwareDistribution
net start wuauserv
Step 3: Exit command prompt and start installation of Windows updates. If you are lucky you will not encounter the 0x80070643 error.
Perform complete manual steps to reset Windows update components.
Solution 3: Install updates manually.
Manual installation of Windows updates is a perfect alternative when Settings → Windows Update fails. In manual installation, you simply download the problematic KB file directly from the Microsoft Catalog page and install it yourself.
Step 1: Open Microsoft Catalog.
https://www.catalog.update.microsoft.com/Home.aspx
Step 2: Search for your Update package. Ex. KB5037849
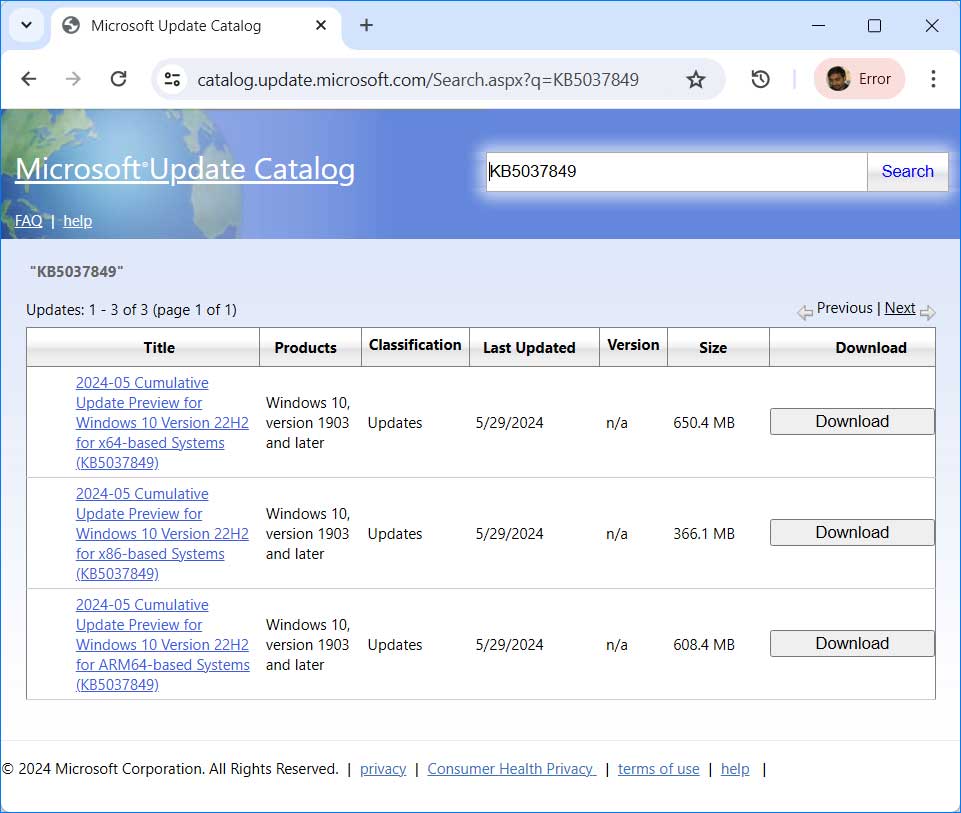
Step 3: Download the package according to your PC configuration and install it.
Solution 4: Hide problematic updates.
Microsoft has released a tool that lets you hide problematic updates, although it can be a bit challenging to find. The option to download this tool has been removed by Microsoft for unknown reasons, but it is still accessible through a direct link on Microsoft’s website. You can download the tool directly from the following location:
Download the wushowhide.diagcab tool on your PC using the following link:
After downloading this tool, just click on it and it will start diagnosing your PC. This tool doesn’t require installation.
Step 1: Double-click on the wushowhide.diagcab tool to open it. Then click on the Next button to start the diagnostic process.
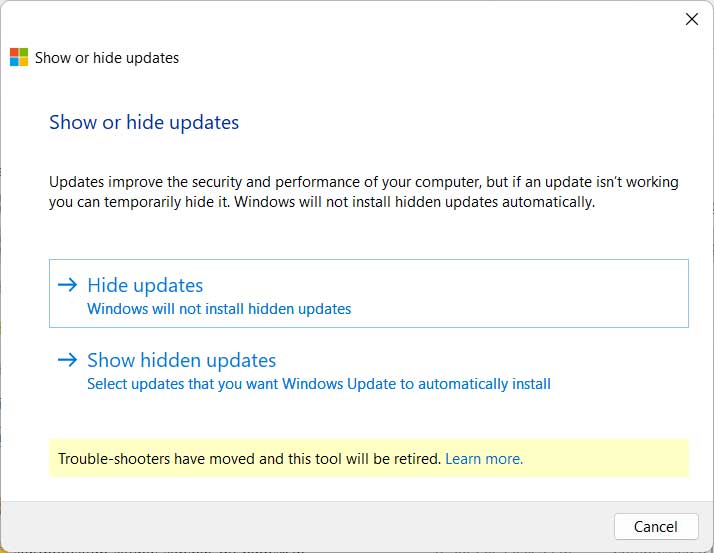
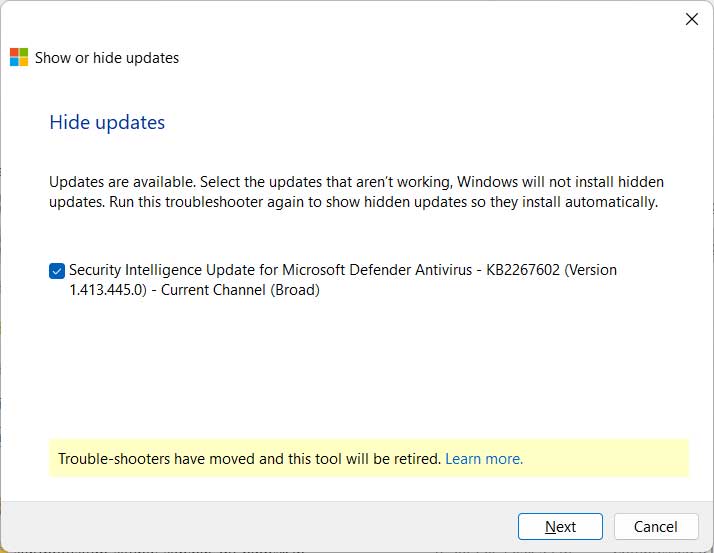
Step 2: Click on “Hide updates.” It will list all the available updates and allow you to hide specific updates. Just select the KB5037768 update.
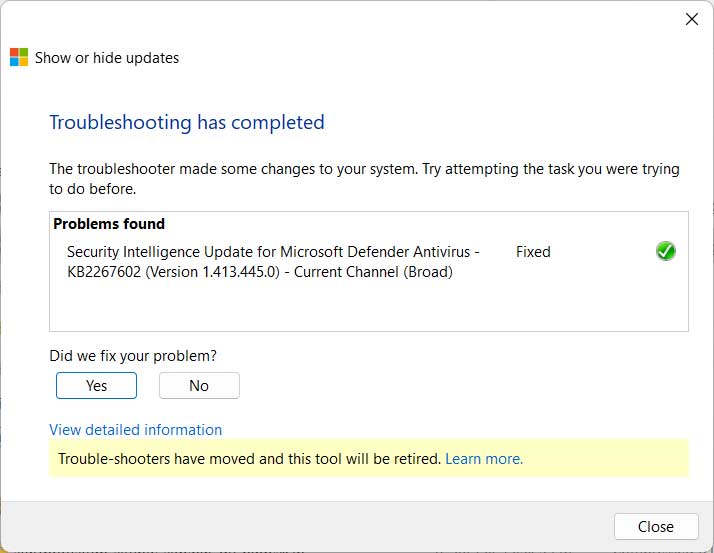
Step 3: You will see a message saying “Troubleshooting has completed.” Click on the Close button to close the troubleshooter.
Step 4: Go to Settings → Windows Update and try to install the updates again.
Solution 5: Add 250 MB more space in Recovery Partition.
Certain update files like KB5034441, KB5037849, and KB5037768 require an additional 250 MB of space in the Recovery partition. If there isn’t enough space available in the Recovery partition, you might encounter the Update error 0x80070643.
Here is a detailed article on how to resize the Recovery Partition.
Solution 6: Clear the Software Distribution and Catroot2 Folder.
The Software Distribution folder and Catroot2 folders store Windows update files and essential components. If these folders contain incomplete or corrupted Windows update files, it can cause issues when installing new updates, resulting in errors. To resolve this problem, you need to clear the Software Distribution folder. This action prompts Windows to download fresh versions of the update files, resolving installation issues.
Step 1: Open Administrator Command Prompt and execute the following commands. These will stops the Windows update service.
net stop bits
net stop wuauserv
net stop cryptsvc
net stop msiserver
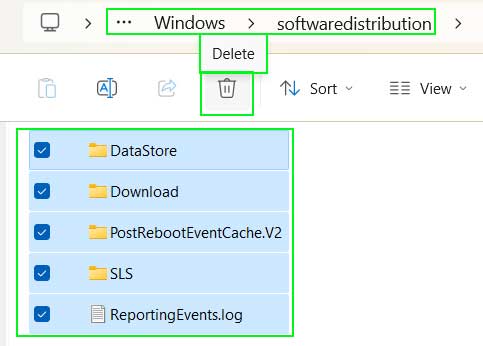
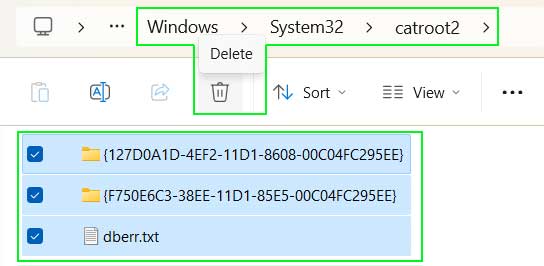
Step 2: Go to following location and delete all the items inside it.
Location 1: C:\Windows\SoftwareDistribution
Location 2: C:\Windows\System32\catroot2
Step 3: Start the update service again. Execute following commands in Administrator command prompts.
net start bits
net start wuauserv
net start cryptSvc
net start msiserver
Solution 7: Update/Repair/Install .net framework.
Windows updates rely heavily on the .NET Framework. If the required version of the .NET Framework is not installed on your computer, or if the installed .NET Framework is outdated or corrupted, you need to resolve .NET Framework-related issues by installing the latest version or repairing/updating the existing .NET Framework installation.
Repair MSVC++ Packages:
If this file is already installed on your computer, repair it as follows:
- Go to Control Panel → Uninstall a program.
- Search Visual C++. It will list all the installed Visual C++ Library.
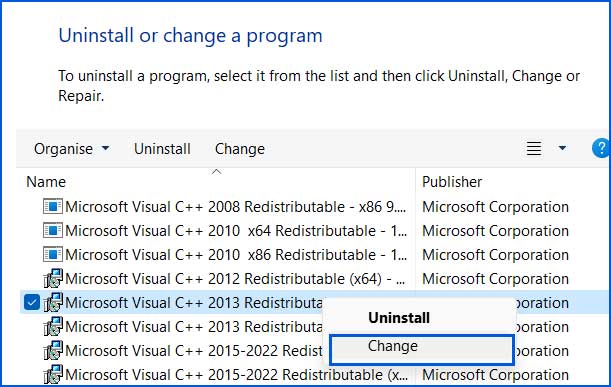
- Right click on both version of Microsoft Visual C++ 2013 Redistributable package one by one and select “Change” option. It will open a pop-up window that will allow you to Repair or Uninstall the program.
- Go with the “Repair” option and after completion the process, make a system reboot.
- It is advisable to repair all the installed MSVCP libraries if they offer “change” option.
Solution 8: Install updates in Clean Boot Mode (to avoid software and driver confliction)
Sometimes, conflicts with other software or drivers can cause Windows update failures. To resolve this issue, you can try installing Windows updates in Clean Boot mode.
How to start Windows 10 in Clean Boot Mode?
To start Windows 10 in Clean Boot mode, follow the steps below.
Step 1: Disable all the third-party services.
- Open System Configuration setting. Search for msconfig in start menu and open System Configuration. additionally, you can also type
msconfigin Run dialog box and open it.

- Go to Services tab. Select “Hide all Microsoft services“
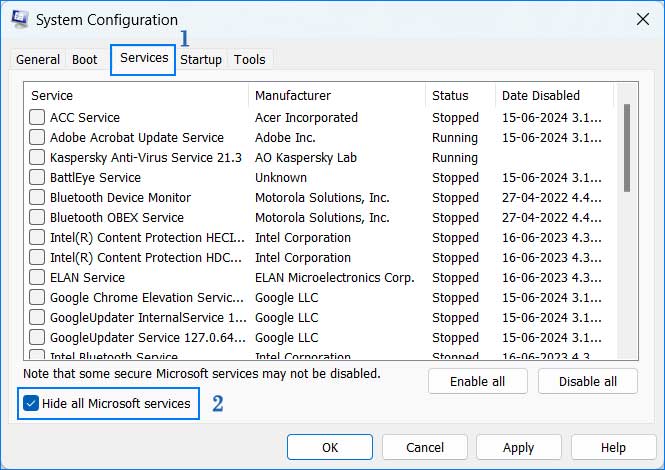
- Click on the “Disable all” button to unselect all the services.
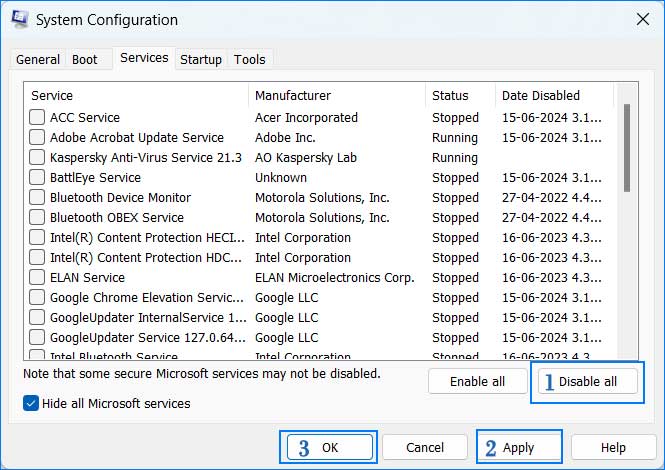
Click on “Apply” button.
Step 2: Disable Startup items.
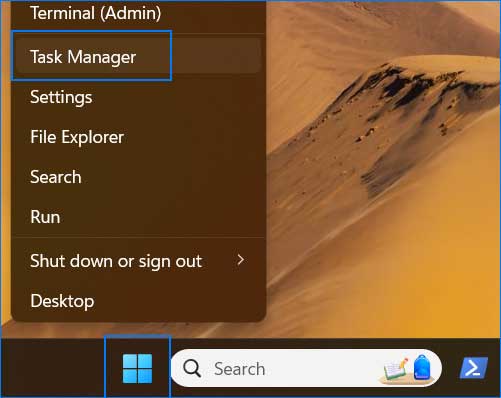
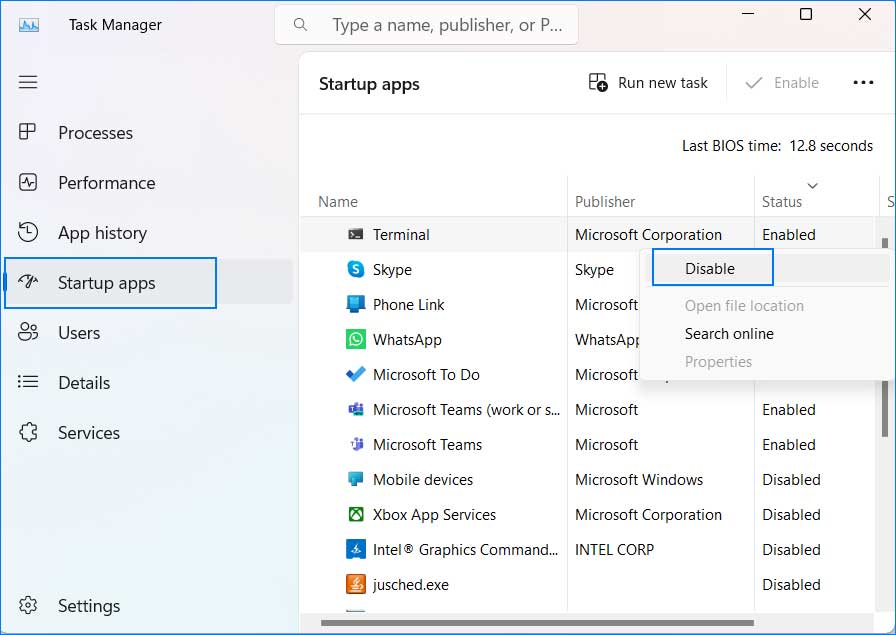
- Open Task Manager and click on the Startup apps.
- Right click on each enabled apps and select “Disable“.
Step 3: Reboot PC.
Solution 9: Run System File Checker Tool.
Windows provides a command-line utility to check and repair Windows integrity using the sfc /scannow command. To use this command, follow these steps:
Step 1: Open Command prompt as Administrator.
Step 2: Execute the following command:
sfc /scannowStep 3: Wait for the process to complete, and then exit from Command Prompt. After repairing the system files, try installing the Windows updates again.
Solution 10: Run DISM command line utility.
DISM (Deployment Image Servicing and Management) is a valuable command-line utility for scanning and repairing corrupted Windows images. This tool is typically used when sfc /scannow fails to repair corrupted Windows files. It requires a working internet connection. DISM scans Windows images, components, and system files. If it detects corruption, it downloads the necessary files from Microsoft’s servers to repair the system.
DISM is a powerful command-line utility used for servicing and preparing Windows images, recovery environments, and Windows setup. You can use this command-line utility as follows:
Step 1: Open Administrator Command Prompt.
Step 2: Execute the following command in sequence.
dism /online /cleanup-image /scanhealth
dism /online /cleanup-image /checkhealth
dism /online /cleanup-image /restorehealth
Step 3: It will take some time, so wait until the process completes. After the process is complete, restart your computer.
Solution 11: Check Disk for errors.
When Windows downloads files, it stores them on the local drive for installation. If there’s corruption in the storage media, Windows may fail to save the files, resulting in update error 0x80070643.
To resolve this issue, you should run the Disk Checker tool on your Windows 10 machine.
Microsoft Windows provides a built-in CHKDSK utility for checking and fixing disk errors. This command-line utility is especially helpful when you are facing slow PC performance or issues with storing or retrieving files. However, it is a good habit to use this tool at regular intervals to keep your PC fast and clutter-free.
You can use this command line tool as follows:
Step 1: Open Command Prompt as Administrator.
Step 2: Execute the commands as follows:
chkdsk /f /rStep 3: It might ask your permission as follows. Press Y to allow permission:
C:\Windows\System32>chkdsk /f /r

The type of the file system is NTFS.

Cannot lock current drive.

Chkdsk cannot run because the volume is in use by another
process.  Would you like to schedule this volume to be
checked the next time the system restarts? (Y/N) Y
Step 4: Restart your PC. The CHKDSK utility will start scanning for bad sectors on the hard drive and errors in the file system or directory and will fix them if any are found.
Solution 12: Restart Windows update service.
Restarting the Windows Update service triggers a scan for pending update files, followed by downloading and installation. This process helps prevent Update error 0x80070643 on Windows 10 or Windows 11 computers.
To restart the Windows Update service, follow this link:
To restart Windows Update-related services, you can either use the command line utility or the Windows Services dialog box.
Using Command Prompt
Step 1: Open Command prompt as Administrator.
Step 2: Execute the following command in sequence.
net stop wuauserv
net stop cryptSvc
net stop bits
net stop msiserver

net start wuauserv
net start cryptSvc
net start bits
net start msiserver
Using Service dialog box
Step 1: Open Run dialog box by pressing the Windows key + R together. Type services.msc and click OK to open Service Dialog box.
Step 2: Find the following services, right click on each and then select Start or Restart.
- Windows Update
- Cryptographic Service
- Background Intelligent Transfer Service
- Microsoft Store Install Service
Solution 13: Use Windows update assistance.
The Windows Update Assistant allows you to download and install feature updates on your computer seamlessly. Visit the official Microsoft site to download this tool, or you can download the Windows Update Assistant using the following link: Windows Update Assistant Download Link
https://www.microsoft.com/en-in/software-download/windows10
This link will direct you to the official Microsoft page where you can download the Windows Update Assistant.
Solution 14: Re-register Windows Installer Service
Sometimes, after downloading Windows updates, the Windows Update service may fail to start automatically. In such cases, you may need to re-register the Windows Installer Service.
Here are the steps to re-register the Windows Installer Service:
Step 1: Open Command Prompt as Administrator.
Step 2: Execute the following commands one by one:
MSIEXEC /UNREGISTER
MSIEXEC /REGSERVER
Step 3: These commands do not produce any output. If the Command Prompt appears blank after executing them, it indicates successful execution. Restart your PC after running these commands.
After restarting, try installing the pending updates again. This process should help resolve the update error 0x80070643.
Solution 15: Run Windows update troubleshooter or Get Help to fix this error.
Windows Update troubleshooter scans all components related to Windows Update, such as the update service, installation components, Distribution folder, Catroot2 folder, etc., and fixes any problems it finds.
Using Windows Update Troubleshooter:
Step 1: Click on the Start menu and search for “Troubleshoot“, then open “Troubleshoot settings“.
Step 2: Navigate to “Other troubleshooters”.
Step 3: Find “Windows Update” and click on “Run” to start the Update troubleshooter.
Step 4: If any issues are detected, the troubleshooter will provide guidance on resolving them.
Using Get Help:
Microsoft is retiring traditional troubleshooters and replacing them with the AI-powered tool called Get Help. This tool offers more effective solutions and provides detailed information, related articles, and a self-diagnostic tool to fix issues.
Step 1: Open the Start menu and search for “Get Help“, then open it.
Step 2: Prompt the tool with queries like “Can’t install Windows update” or “Encountering 0x80070643 error during Windows update“. Choose the appropriate option, and the tool will automatically diagnose and offer solutions to fix the update-related issue.
These steps provide efficient ways to diagnose and resolve Windows update problems using built-in troubleshooting tools and the advanced capabilities of the Get Help tool.
Solution 16: Turn off Security software temporarily.
Security programs can sometimes block Windows updates from downloading certain security-related updates, which can lead to update error 0x80070643. To resolve this issue, you should temporarily turn off or disable your Windows security program and then attempt to restart the Windows updates.
To temporarily disable a security program, the steps can vary depending on the type of security software you are using. Here’s a general approach:
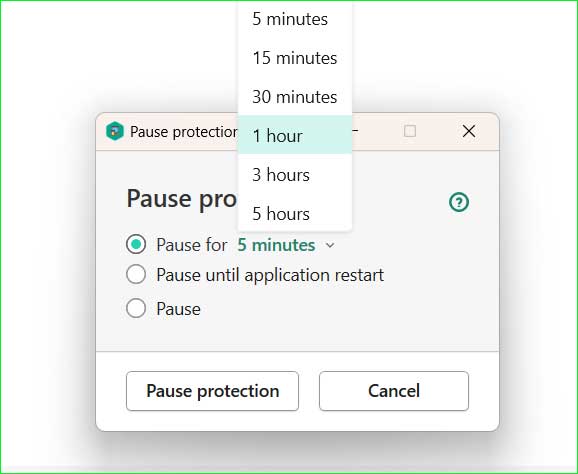
Step 1: Go to the Windows notification area, which is at the end of the taskbar. Find the security program icon and right-click on it.
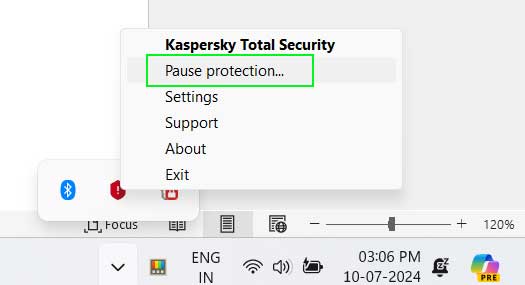
Step 2: Select “Pause protection.” Choose the duration and click OK.
Solution 17: Repair Windows Installation by perfroming In-place upgrade.
If all the previously mentioned methods fail to repair Windows update components and you continue to encounter the error 0x80070643, repairing the Windows installation may be necessary.
Here are the steps to repair Windows installation:
How to Perform an In-Place Upgrade
In an in-place upgrade, no files, folders, or applications will be deleted.
Preparation:
Before starting the in-place upgrade, follow these guidelines:
- Sign in as an Administrator.
- Disconnect all external peripherals and devices except the mouse, keyboard, and LAN cable.
- Disable or uninstall any third-party antivirus programs.
- Keep a backup of important folders, files, and settings.
Step 1: Download the Media Creation Tool for Windows 10 or Windows 11, depending on your PC’s operating system.
Windows 10: https://www.microsoft.com/en-us/software-download/windows10
Windows 11: https://www.microsoft.com/software-download/windows11
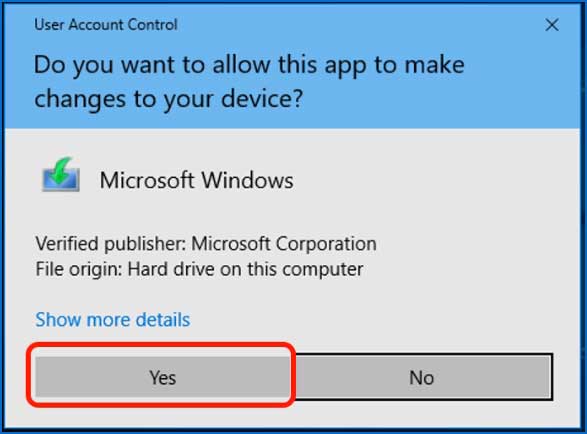
Step 2: If you see a User Account Control (UAC) prompt, click Yes.
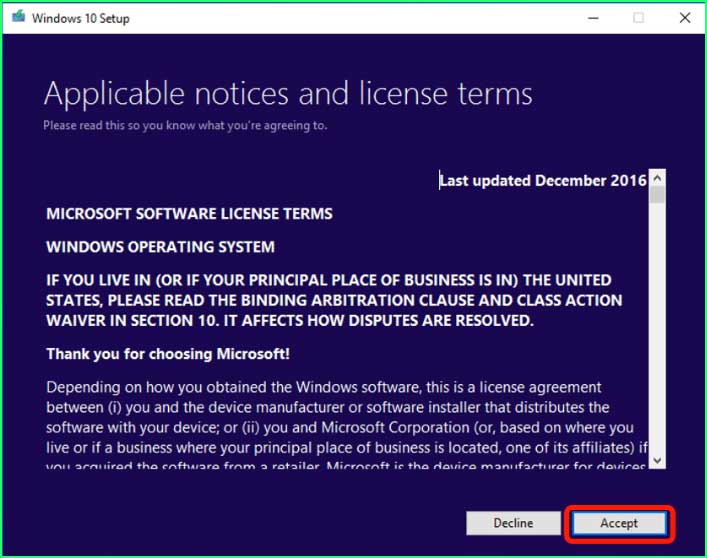
Step 3: Once the download is complete, the Windows 10 or Windows 11 setup will open. Read the License Agreement and click Accept.
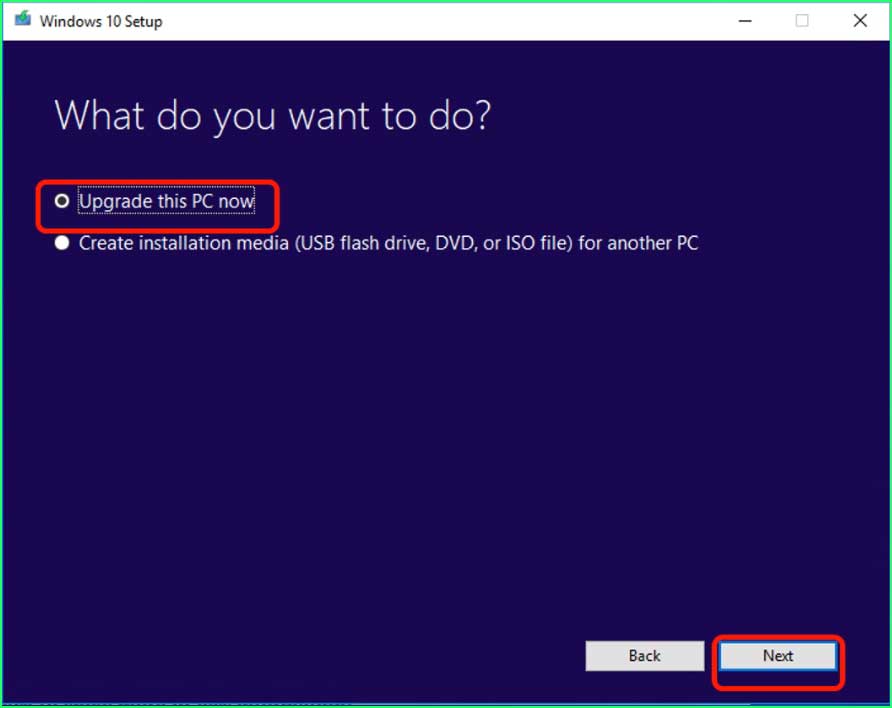
Step 4: Select Upgrade this PC now and click Next.
Step 5: When the upgrade is ready to install, click the Install button to begin the process.
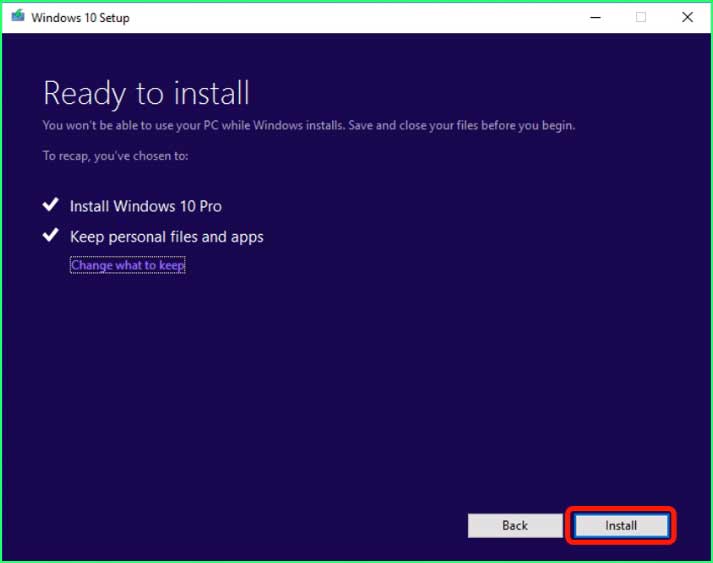
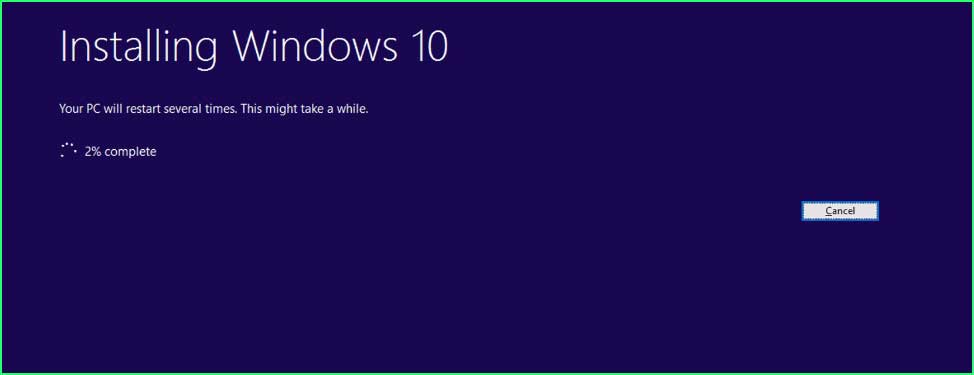
Step 6: The Windows 10/11 upgrade installation will start.
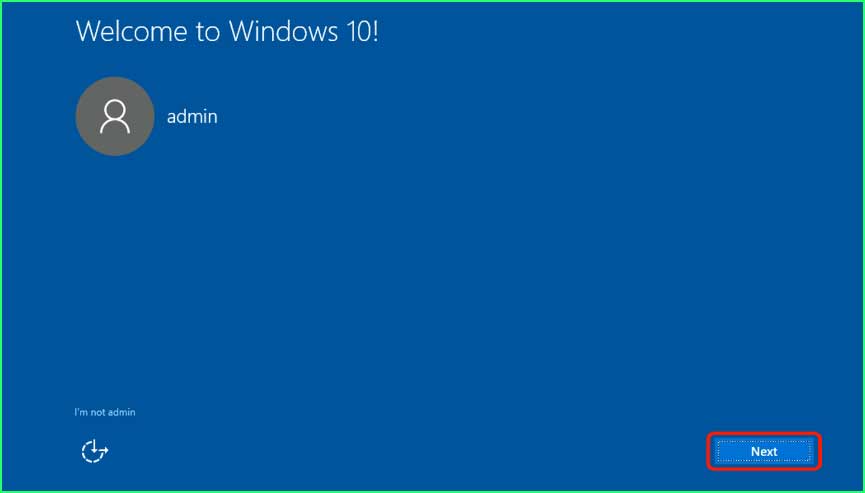
Step 7: After the installation completes, select your sign-in account.
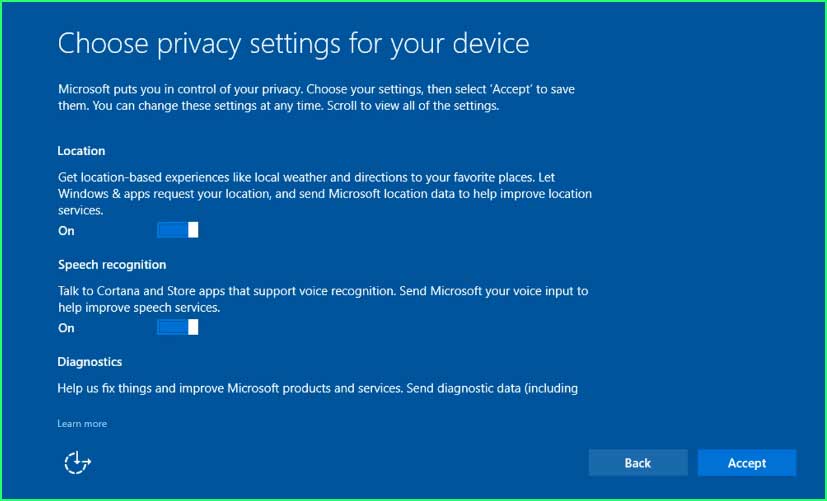
Step 8: Choose your privacy settings for the device and click Accept.
Step 9: If you wish to use Cortana, click the Use Cortana button.
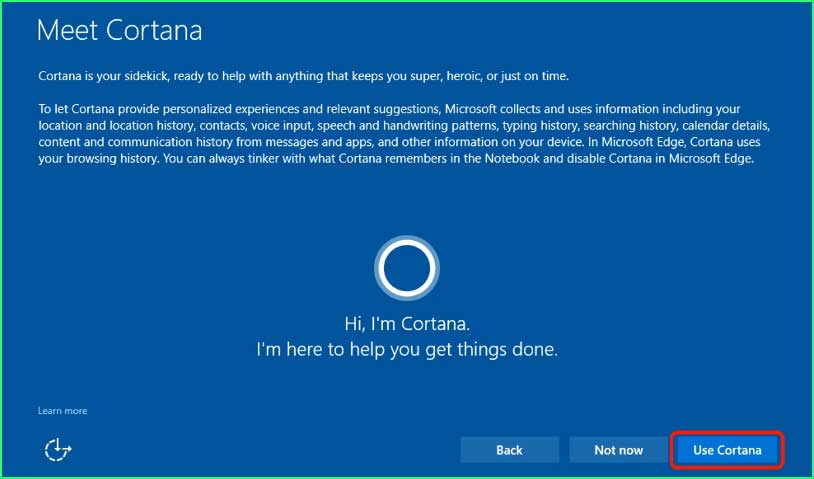
Step 10: You’re all set! The In-place upgrade has finished, and you will reach the sign-in screen.
Performing a repair installation using these methods should help resolve persistent issues with Windows update components and error 0x80070643. Ensure you have backups of important data before proceeding with any repair or reinstall procedures.
Conclusion:
There are multiple methods to fix Windows update error 0x80070643, but the most suitable method for your operating system may vary. Therefore, it is recommended to start troubleshooting with Solution 1 and continue applying subsequent methods until you resolve the issue. This approach ensures comprehensive troubleshooting and increases the likelihood of finding the solution that works for your system.