Error Message:
“We couldn’t install this update, but you can try again. (0x8007000d)”
If you’re encountering the Windows Update Error 0x8007000D, don’t worry! You can follow these steps to resolve the issue:
- Restart the Windows Update service.
- Reset the Windows Update components.
- Run the SFC and DISM commands to repair corrupted system files and Windows images.
- Use the Windows Update Assistant.
- Temporarily disable the Windows Security program.
- Download and install the KB update manually.
Understanding the Error:
When attempting to install Windows updates via Settings → Windows Updates, the process may stall and eventually fail, displaying error code 0x8007000D. This is a common issue, particularly affecting computers running Windows 10 and Windows 11.
In this guide, we’ll walk you through a series of steps to fix this error efficiently on Windows 10/11.
How to Resolve the 0x8007000D Error:
To effectively fix this error, it’s important to first optimize your PC’s performance by addressing common issues like clutter, missing system files, corrupted files, registry errors, and driver problems. One easy way to achieve this is by using an advanced system repair tool like Outbyte. However, manual steps can also be taken to troubleshoot and resolve this error.

#1 PC Optimizer Tool
- ✅Solve more than a hundred of the most common PC issues
- ✅ Optimize Windows and Boost Windows Performance.
- ✅ Clean Disk Space
- ✅ Privacy Protection
- ✅ Protect PC by resolving common vulnerabilities
- ✅ Real Time Boost
- ✅ Real Time Privacy
- ✅ Smart File Removal
Solution 1: Restart the Windows Update Service
The first and simplest solution is to restart the Windows Update service. Often, this is enough to resolve error code 0x8007000D and allow the update process to continue successfully.
Here’s how to restart the Windows Update service:
- Open Command Prompt as Administrator.
- Stop the services by entering these commands:
net stop wuauserv

net stop cryptSvc

net stop bits

net stop msiserver
- Restart the services with these commands:
net start wuauserv

net start cryptSvc

net start bits

net start msiserver
Solution 2: Reset Windows Update Components
If restarting the service doesn’t fix the issue, try resetting the Windows Update components. This forces Windows to download fresh update files, which can often solve the problem.
Follow these steps to reset the Windows Update components:
Step 1: Open Administrator Command Prompt and execute the following commands. These will stops the Windows update service.
net stop bits
net stop wuauserv
net stop cryptsvc
net stop msiserver
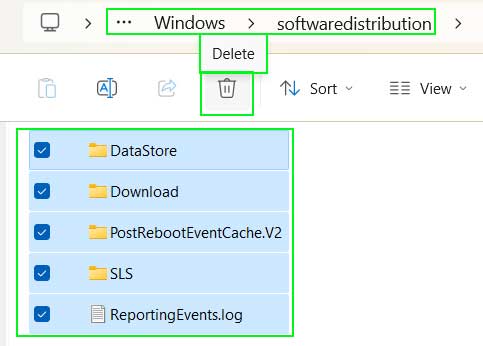
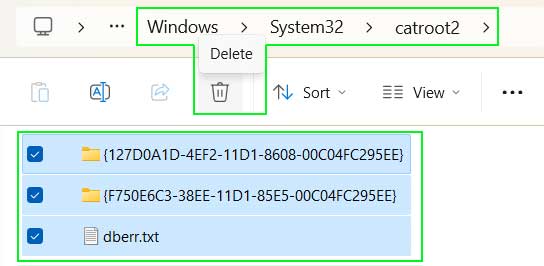
Step 2: Go to following location and delete all the items inside it.
Location 1: C:\Windows\SoftwareDistribution
Location 2: C:\Windows\System32\catroot2
Step 3: Start the update service again. Execute following commands in Administrator command prompts.
net start bits
net start wuauserv
net start cryptSvc
net start msiserver
Solution 3: Repair Corrupted System Files
Corrupted system files, missing DLL files, or a corrupted Windows image may prevent updates from installing correctly. To resolve this, you should repair Windows using built-in utilities like SFC (System File Checker) and DISM (Deployment Imaging Service and Management).
Here’s how to run SFC and DISM to repair corrupted files:
SFC Command
Step 1: Open Admin Command Prompt.
Step 2: Execute the command.
C:\Windows\System32> sfc /scannow

Beginning system scan.  This process will take some time.

Beginning verification phase of system scan.
Verification 100% complete.

Windows Resource Protection found corrupt files but was unable to fix some of them. Details are included in the CBS.Log windir\Logs\CBS\CBS.log. For example C:\Windows\Logs\CBS\CBS.log.

C:\Windows\System32>
Step 3: Reboot your PC.
DISM Command
Step 1: Open elevated Command Prompt.
Step 2: Execute the following commands in sequence.
1. DISM – Check Health
C:\Windows\System32> dism /Online /Cleanup-Image /CheckHealth

Deployment Image Servicing and Management tool
Version: 10.0.22621.2792

Image Version: 10.0.22631.3737

No component store corruption detected.
The operation completed successfully.
2. DISM – Scan Health
C:\Windows\System32> dism /Online /Cleanup-Image /ScanHealth

Deployment Image Servicing and Management tool
Version: 10.0.22621.2792

Image Version: 10.0.22631.3737

[==========================100.0%==========================]

No component store corruption detected.
The operation completed successfully.

C:\Windows\System32>
3. DISM – Restore Health
C:\Windows\System32> dism /Online /Cleanup-Image /RestoreHealth

Deployment Image Servicing and Management tool
Version: 10.0.22621.2792

Image Version: 10.0.22631.3737

[==========================100.0%==========================]

The restore operation completed successfully.
The operation completed successfully.

C:\Windows\System32>
Step 3: It will take some time to finish the process so keep patience and let the process completes.
Solution 4: Use the Windows Update Assistant
If the above steps don’t work, you can try using the Windows Update Assistant. This tool automatically downloads and installs the latest Windows updates based on your operating system version and build.
Download the Windows Update Assistant from Microsoft’s official website:
https://www.microsoft.com/en-in/software-download/windows10
Solution 5: Temporarily Deactivate the Windows Security Program
At times, antivirus programs, firewalls, or other security tools may block updates from being downloaded or installed, resulting in error 0x8007000D. Temporarily disabling these security programs could help bypass the issue.
Here’s how to disable your security software temporarily:
To temporarily disable a security program, the steps can vary depending on the type of security software you are using. Here’s a general approach:
Step 1: Go to the Windows notification area, which is at the end of the taskbar. Find the security program icon and right-click on it.
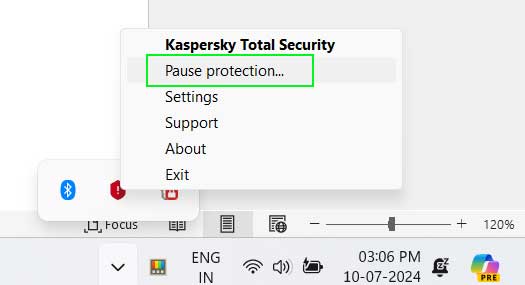
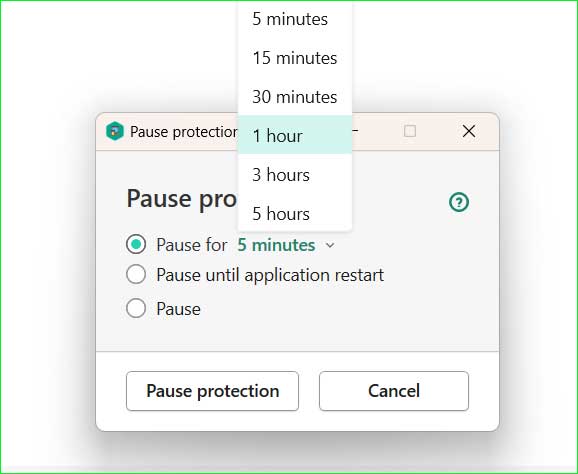
Step 2: Select “Pause protection.” Choose the duration and click OK.
Solution 6: Manually Download and Install the KB Update
If you’re encountering error 0x8007000D while installing a specific KB update (such as KB5041580 or KB5041582), you can manually search for and install the update. This can be done by visiting the Microsoft Update Catalog, finding the appropriate KB file, and installing it.
Learn how to manually install KB updates:
Step 1: Open Microsoft Catalog.
https://www.catalog.update.microsoft.com/Home.aspx
Step 2: Search for your Update package. Ex. KB5037849
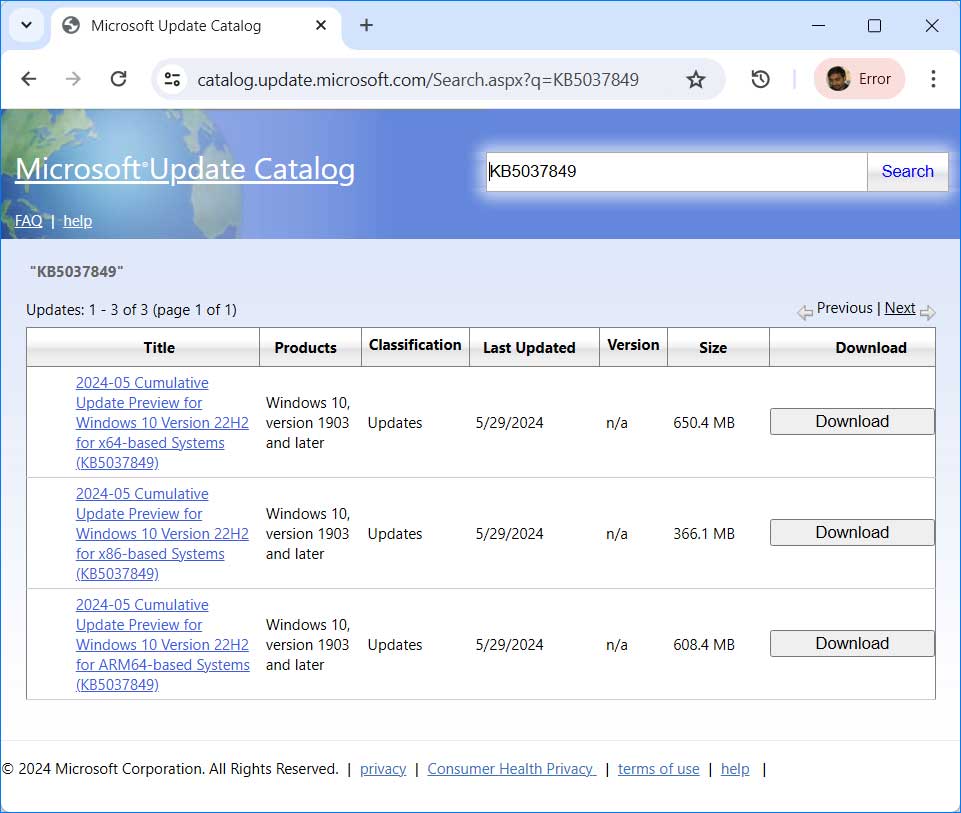
Step 3: Download the package according to your PC configuration and install it.
Conclusion:
The Windows Update Error 0x8007000D can occur unexpectedly during the update process. However, by following the outlined steps—restarting services, resetting components, repairing system files, using the Update Assistant, disabling security programs, or manually installing updates—you can resolve the issue and keep your system up to date.