At times, for unknown reasons, Windows updates—specifically KB5011048 fail to install, displaying error code 0x80070057. This article provides a clear explanation on fix kb5011048 fails to install error windows 10 &11.
Solutions to resolve KB5011048 update failes issue.
- Solution 1: Scan and repair disk errors
- Solution 2: Install KB5011048 independently
- Solution 3: Scan for bad hardware
- Solution 4: Scan and remove malware
- Solution 5: Run SFC and DISM to repair corrupted system files.
- Solution 6: Perform in-place upgrade to repair Windows installation
Download PC Repair + Optimiser Tool
Clean and Optimize your PC. 4.2 Trustpilot Rating ⭐⭐⭐⭐⭐
Solution 1: Scan and Repair DISK errors
This is one of the most common reasons behind update failures on Windows 11. A corrupted storage disk or bad sectors on the disk can result in various hexadecimal error codes during the Windows update installation process.
It is recommended to run the disk check command to determine if there are any bad sectors on the hard disk or SSD that might be preventing the installation of update KB5011048.
The disk check utility is free and comes preinstalled with Microsoft Windows. You can easily use this command-line tool in an administrative command prompt. Here are the complete steps on how to use the disk check command on Windows OS.
Step 1: Open Command Prompt as Administrator.
Step 2: Execute the commands as follows:
chkdsk /f /rStep 3: It might ask your permission as follows. Press Y to allow permission:
C:\Windows\System32>chkdsk /f /r

The type of the file system is NTFS.

Cannot lock current drive.

Chkdsk cannot run because the volume is in use by another
process.  Would you like to schedule this volume to be
checked the next time the system restarts? (Y/N) Y
Step 4: Restart your PC. The CHKDSK utility will start scanning for bad sectors on the hard drive and errors in the file system or directory and will fix them if any are found.
Solution 2: Install KB5011048 independently to fix KB5011048 fails to install error Windows 11
Accessing Settings → Windows Update is not the only way to install updates on your system. Alternatively, you can download the problematic update package directly from the Microsoft Update Catalog website and install it manually on your Windows PC. This is an excellent and easy method to resolve the KB5011048 installation failure on Windows 10.
Step 1: Open Microsoft Catalog.
https://www.catalog.update.microsoft.com/Home.aspx
Step 2: Search for your Update package. Ex. KB5037849
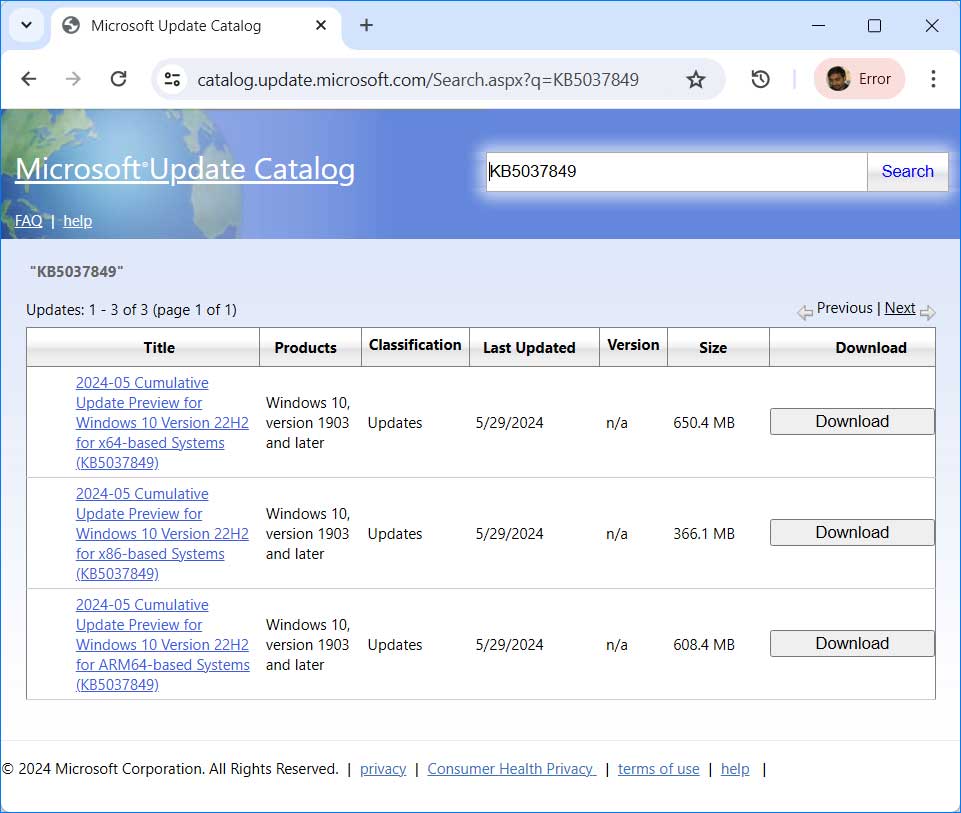
Step 3: Download the package according to your PC configuration and install it.
Solution 3: Scan for bad hardware
Download PC Repair + Optimiser Tool
Clean and Optimize your PC. 4.2 Trustpilot Rating ⭐⭐⭐⭐⭐
Failing hardware, such as a faulty hard disk or SSD, can cause the KB5011048 installation error on Windows 11. To check if your primary storage device is failing or has bad sectors, run the Memory Diagnostics tool. If the tool detects issues with your storage device, it is recommended that you replace the faulty HDD/SSD immediately. Faulty hardware can also lead to boot errors, such as Installation Error 0xe0000100, CBS_E_INSUFFICIENT_DISK_SPACE, 0x80070643 – ERROR_INSTALL_FAILURE, and others.
Here’s the symptoms that signals to bad hardware.
- Overheating
- Strange noises coming from your laptop or PC
- Decreased PC performance
- Frequent error messages
- Serious system issues, such as system crashes or BSOD (Blue Screen of Death) errors
- Frequent boot errors
- How to Check if Your Hard Drive is Failing
Run the Memory Diagnostic Tool
To run the Memory Diagnostic Tool, follow these steps.
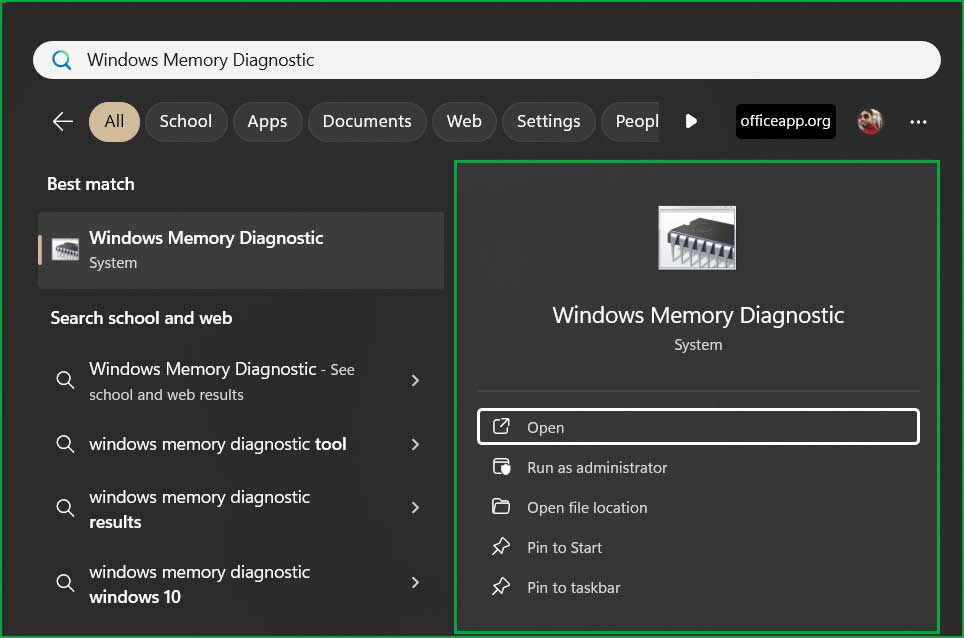
Step 1: Click on Start menu and search for “Windows Memory Diagnostic” and open it.
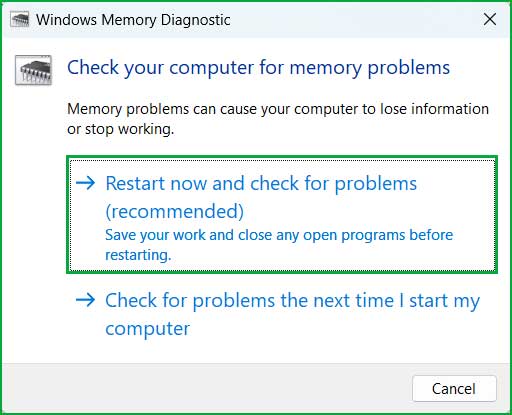
Step 2: It will ask you to Restart your PC to start diagnostic.
Step 3: After reboot, the diagnostic will start automatically. Just let them complete the diagnostic. You can see the diagnostic result at here.
- Open Event Viewer from Start menu.
- Navigate to Windows Logs → System. Click on Filter Current Log… from right side menu.
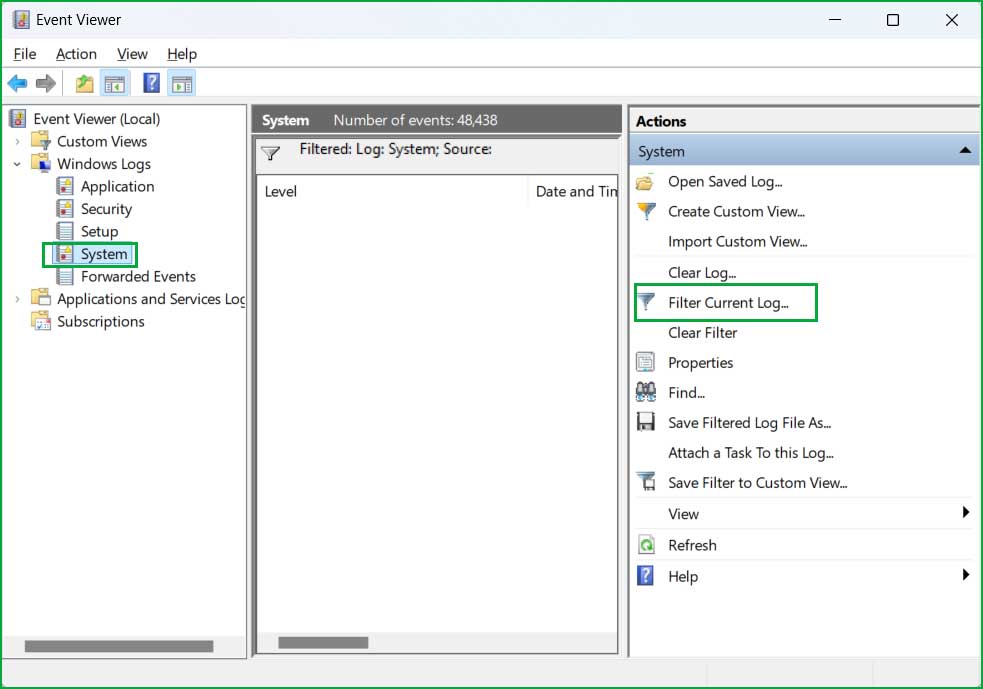
- Select “MemoryDiagnostics-Results” from the Event sources and click OK.
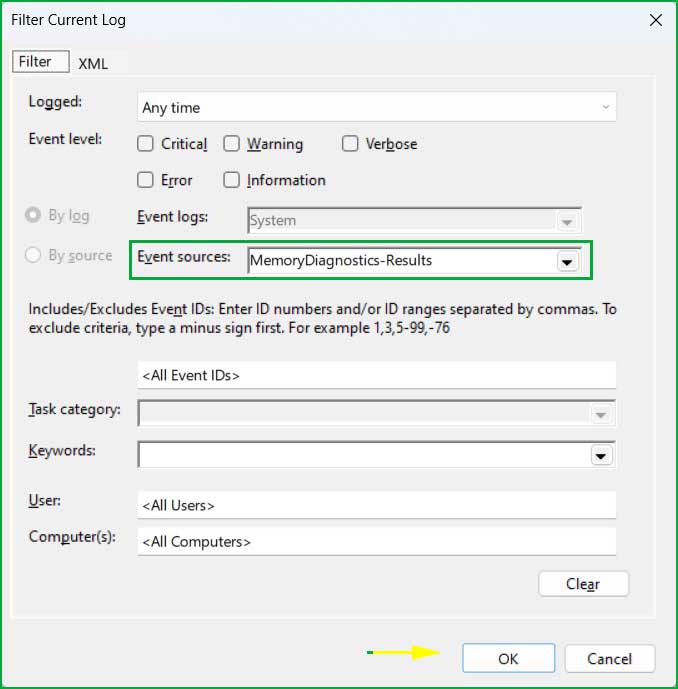
- It will show you recent memory diagnostic results.
Solution 4: Scan and remove malware
Malware is one of the leading causes of many Windows issues. The KB5011048 installation failure may also occur due to malware infections. To resolve this, scan your Windows PC using Windows Defender or a third-party antivirus tool to remove malware and other suspicious programs.
Solution 5: Run SFC and DISM to repair corrupted system files.
System file corruption is another major cause of various Windows issues. Fortunately, Microsoft provides free command-line tools to scan and repair corrupted system files. SFC (System File Checker) and DISM (Deployment Image Servicing and Management) are two of the most useful tools for scanning and fixing corrupted files, as well as repairing damaged Windows images.
Run these command line tool as follows:
SFC Command
Step 1: Open Admin Command Prompt.
Step 2: Execute the command.
C:\Windows\System32> sfc /scannow

Beginning system scan.  This process will take some time.

Beginning verification phase of system scan.
Verification 100% complete.

Windows Resource Protection found corrupt files but was unable to fix some of them. Details are included in the CBS.Log windir\Logs\CBS\CBS.log. For example C:\Windows\Logs\CBS\CBS.log.

C:\Windows\System32>
Step 3: Reboot your PC.
DISM Command
Step 1: Open elevated Command Prompt.
Step 2: Execute the following commands in sequence.
1. DISM – Check Health
C:\Windows\System32> dism /Online /Cleanup-Image /CheckHealth

Deployment Image Servicing and Management tool
Version: 10.0.22621.2792

Image Version: 10.0.22631.3737

No component store corruption detected.
The operation completed successfully.
2. DISM – Scan Health
C:\Windows\System32> dism /Online /Cleanup-Image /ScanHealth

Deployment Image Servicing and Management tool
Version: 10.0.22621.2792

Image Version: 10.0.22631.3737

[==========================100.0%==========================]

No component store corruption detected.
The operation completed successfully.

C:\Windows\System32>
3. DISM – Restore Health
C:\Windows\System32> dism /Online /Cleanup-Image /RestoreHealth

Deployment Image Servicing and Management tool
Version: 10.0.22621.2792

Image Version: 10.0.22631.3737

[==========================100.0%==========================]

The restore operation completed successfully.
The operation completed successfully.

C:\Windows\System32>
Step 3: It will take some time to finish the process so keep patience and let the process completes.
Solution 6: Perform in-place upgrade to repair Windows installation
If none of the above solutions work, try repairing your Windows OS using an in-place upgrade. This is a safe method to repair a damaged Windows system without losing your files. To perform an in-place upgrade, follow these steps:
How to Perform an In-Place Upgrade
In an in-place upgrade, no files, folders, or applications will be deleted.
Preparation:
Before starting the in-place upgrade, follow these guidelines:
- Sign in as an Administrator.
- Disconnect all external peripherals and devices except the mouse, keyboard, and LAN cable.
- Disable or uninstall any third-party antivirus programs.
- Keep a backup of important folders, files, and settings.
Step 1: Download the Media Creation Tool for Windows 10 or Windows 11, depending on your PC’s operating system.
Windows 10: https://www.microsoft.com/en-us/software-download/windows10
Windows 11: https://www.microsoft.com/software-download/windows11
Step 2: If you see a User Account Control (UAC) prompt, click Yes.
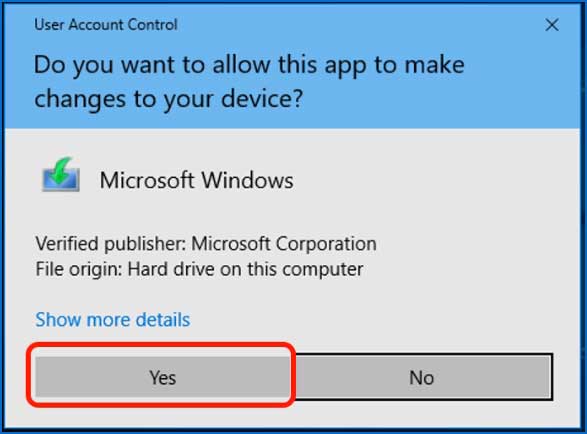
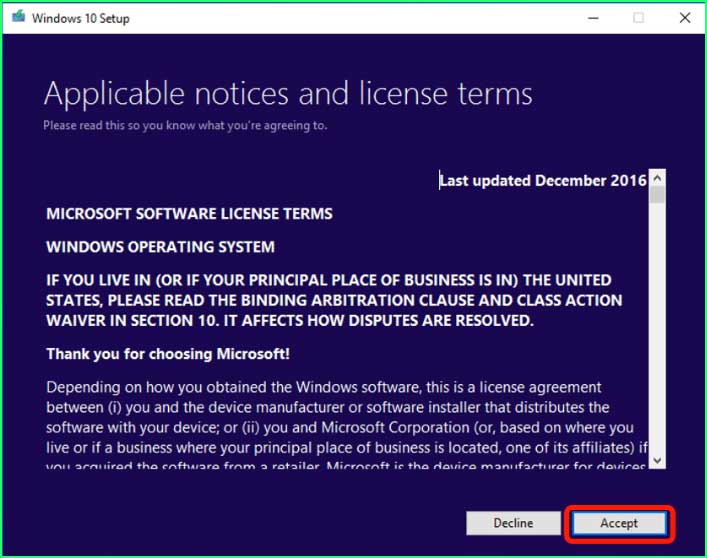
Step 3: Once the download is complete, the Windows 10 or Windows 11 setup will open. Read the License Agreement and click Accept.
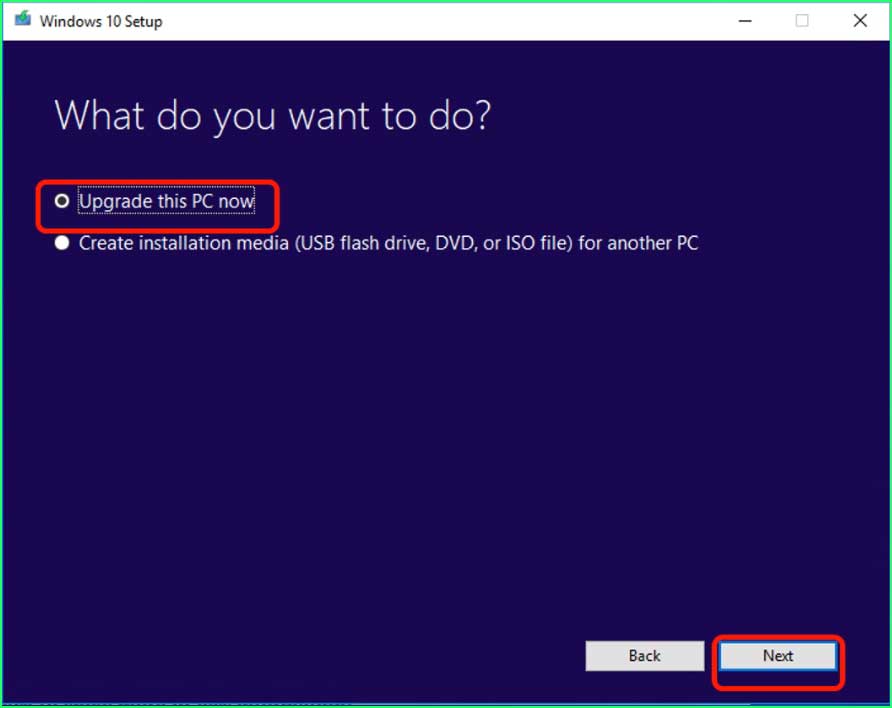
Step 4: Select Upgrade this PC now and click Next.
Step 5: When the upgrade is ready to install, click the Install button to begin the process.
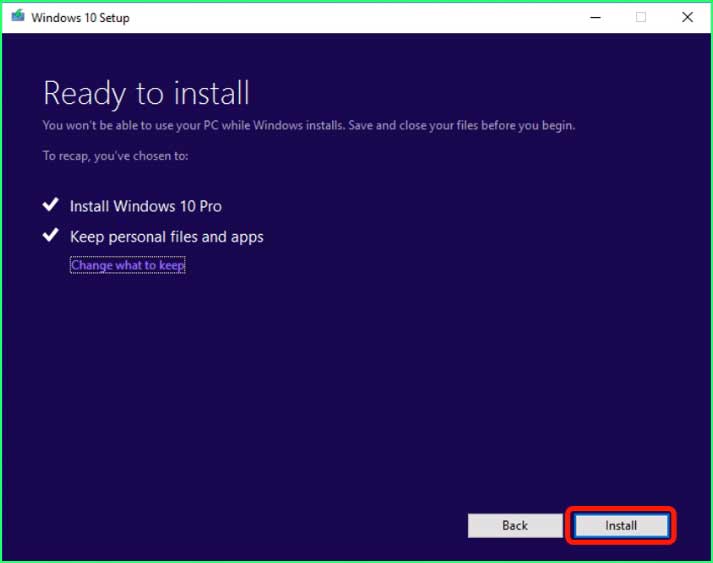
Step 6: The Windows 10/11 upgrade installation will start.
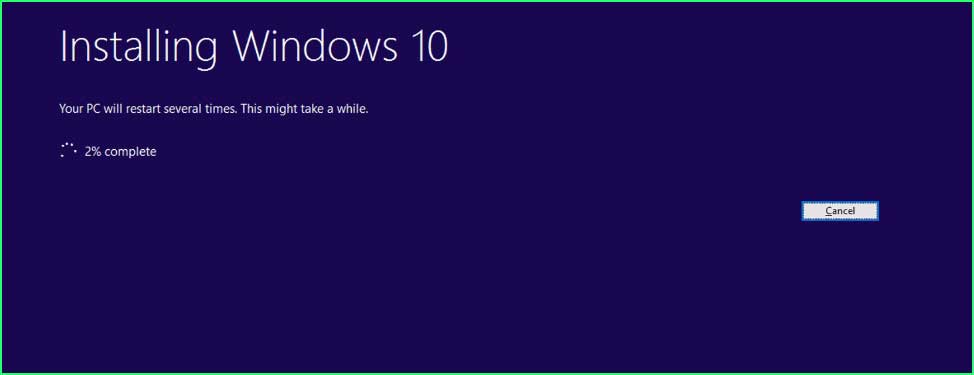
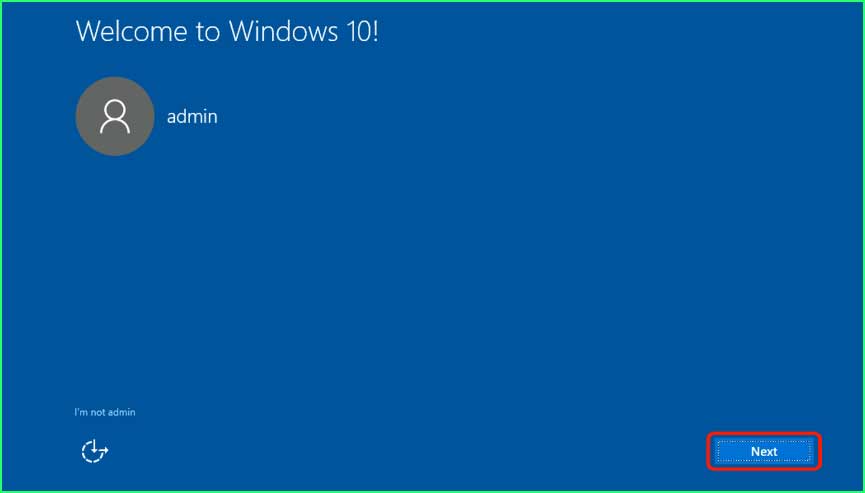
Step 7: After the installation completes, select your sign-in account.
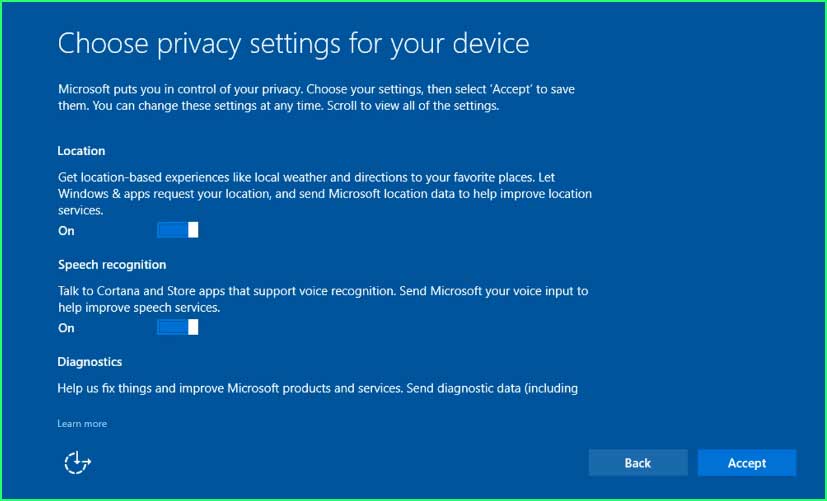
Step 8: Choose your privacy settings for the device and click Accept.
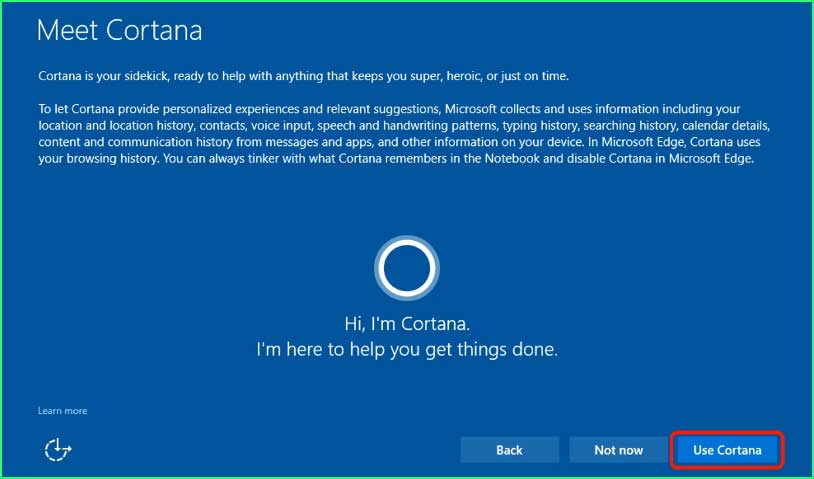
Step 9: If you wish to use Cortana, click the Use Cortana button.
Step 10: You’re all set! The In-place upgrade has finished, and you will reach the sign-in screen.
Conclusion
To fix KB5011048 fails to install error windows 10, you need to take several steps, such as scanning for bad sectors on primary storage devices, replacing faulty hardware, running system repair command-line tools, manually installing updates, and performing in-place upgrades. By following these methods, you should be able to resolve the KB5011048 installation error on Windows 11 as well.