The Install Error 0x80070103 occurs mostly when installing or updating a driver on Windows 10 or Windows 11 machine. You can perform following actions in order to fix Install Error 0x80070103 Windows 11/10.
Solution to Error 0x80070103
- Remove the installed driver and install the fresh and latest version of drivers.
- Hide the problematic driver updates.
- Clear Windows Update Cache.
- Try Clean Boot Mode to install driver updates.
- Try Downloading and Installing Updates Manually.
- Run SFC and DISM to fix corrupted system file issues.
- Use Get Help section to resolve this issue.
If you are receiving this error when installing Graphics Driver from Intel, you can perform following actions to fix this error.
- Uninstall the existing Intel® Driver and Support Assistant (Intel® DSA).
- Restart your computer.
- Download and Install the latest Intel® DSA.
Why 0x80070103?
The error code 0x80070103 mostly occurs when you try to install updates and Windows finds that the latest version of driver already installed on your computer. It creates some type of update paradox. Windows finds the different version of update file on Microsoft Catalog and when try download and install, they find the newer version already installed.
It creates loop for Windows updates that continuously checks for drivers updates but can’t install them on your computer.
Sometimes, due to older version of hardware, Windows updates finds it incompatible for newer versions of drivers and thus you are getting the same error. Apart from it, several apps fails to start with error code 0xc0000142.
It has been also seen that this installation error mostly occurs when installing Intel graphics driver on Windows 10/11 computer.
In this article, we will guide you thoroughly on how you can fix this problem on your PC.
Most of the driver error occurs due to corrupted system files, outdated drivers and Windows updates, glitches in system registry, missing system files etc. It is recommended to fix driver errors and glitches from your computer using the Driver Repair Tool.

Download Driver Easy for Windows 10/11
- Over 18 Million Drivers Available to Download.
- Install, Scan and Update all your drivers.
- Supports Windows 11, 10, 8, 8.1, 7 & Windows Server.
- Uses Advanced Hardware-matching technology to detect all your connected hardware and devices.
Disclaimer: We earn an affiliate commission when you purchase items through our affiliate links. This helps us maintain our domain and web server.
Solution 1: Remove and Re-install buggy Drivers.
Why not remove the buggy drivers and install the fresh and latest version of driver from the official website. By this way you will be able to remove 0x80070103 error easily. If you don’t know how to remove driver from Windows 11/10, you can do this as follows.
Step 1: Remove the faulty driver.
- Open Device Manager. Press Windows + X and click on Device Manager to open it.
- Expand the Devices → Right click on driver → Click on Uninstall device.
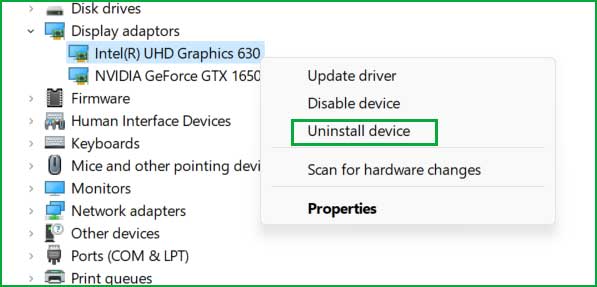
- Follow the process and remove the faulty driver.
Step 2: Go to the Device’s official website and download the latest and compatible version of driver and install it.
Solution 2: Hide the problematic driver’s update
If your computer and devices are working fine then it is better idea to just ignore the update and hide it using the wushowhide.diagcab tool. This tool is free and can be downloaded from the official Microsoft website.
Download the wushowhide.diagcab tool on your PC using the following link:
After downloading this tool, just click on it and it will start diagnosing your PC. This tool doesn’t require installation.
Step 1: Double-click on the wushowhide.diagcab tool to open it. Then click on the Next button to start the diagnostic process.
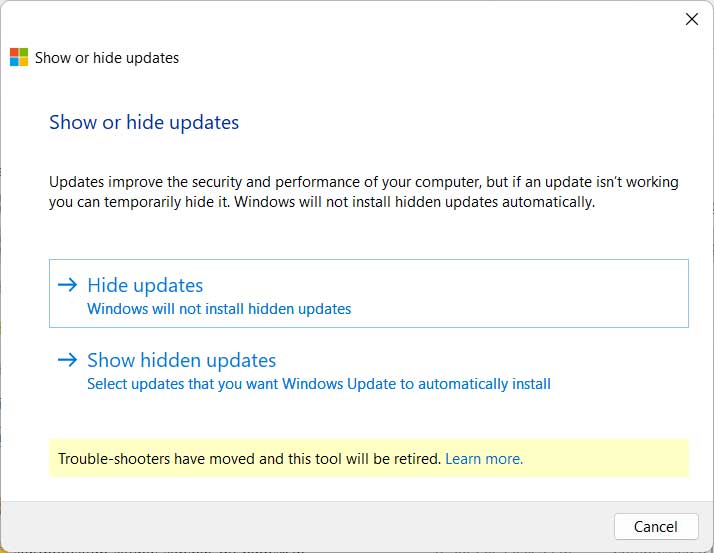
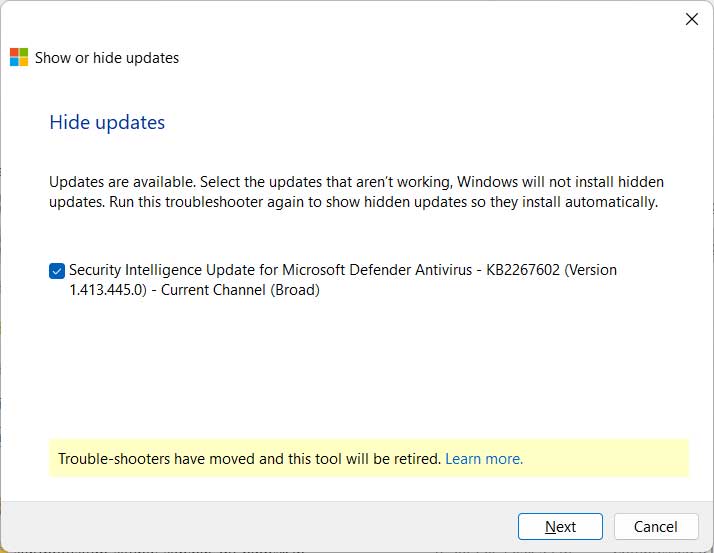
Step 2: Click on “Hide updates.” It will list all the available updates and allow you to hide specific updates. Just select the KB5037768 update.
Step 3: You will see a message saying “Troubleshooting has completed.” Click on the Close button to close the troubleshooter.
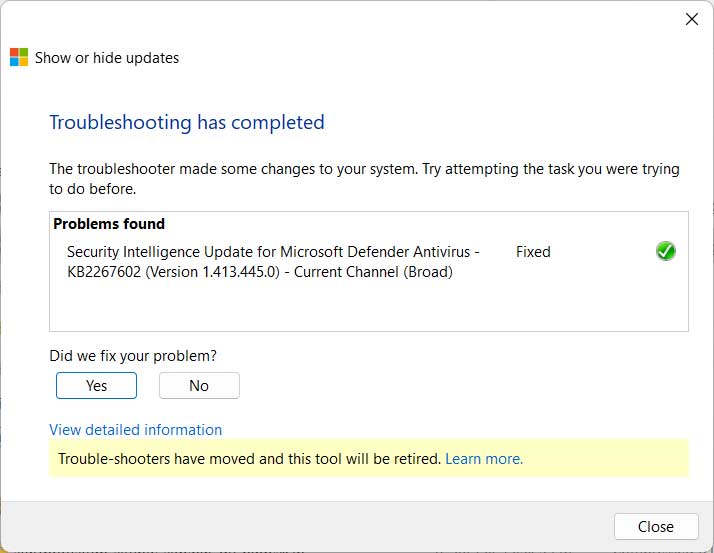
Step 4: Go to Settings → Windows Update and try to install the updates again.
Solution 3: Clear Windows Update cache
The driver update error 0x80070103 can also be fixed by clearing Windows update cache. There might be previously downloaded driver file are stored in the Update cache that is blocking the Windows update to install new driver updates. You can clear the Windows update cache as follows:
Step 1: Open Administrator Command Prompt and execute the following commands. These will stops the Windows update service.
net stop bits
net stop wuauserv
net stop cryptsvc
net stop msiserver
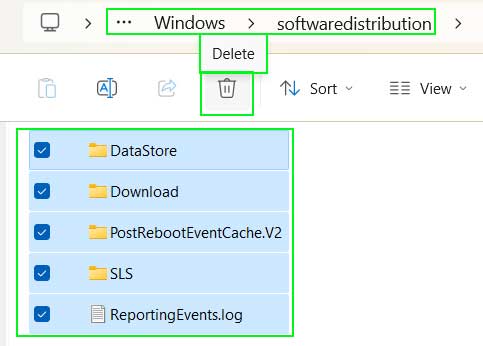
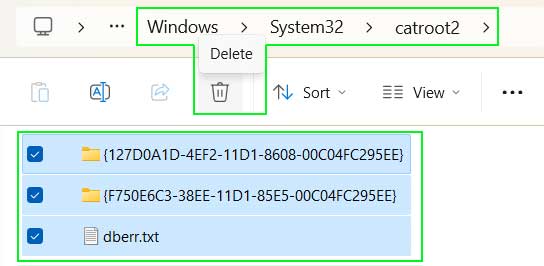
Step 2: Go to following location and delete all the items inside it.
Location 1: C:\Windows\SoftwareDistribution
Location 2: C:\Windows\System32\catroot2
Step 3: Start the update service again. Execute following commands in Administrator command prompts.
net start bits
net start wuauserv
net start cryptSvc
net start msiserver
Solution 4: Try Clean Boot Mode to install driver updates
If you are getting the error code 0x80070103 when installing particular driver updates in normal Windows mode, then try to install it the Clean Boot Mode. In this mode, there is no driver conflict so you can install update file without getting any additional error.
How to start Windows 10 in Clean Boot Mode?
To start Windows 10 in Clean Boot mode, follow the steps below.
Step 1: Disable all the third-party services.
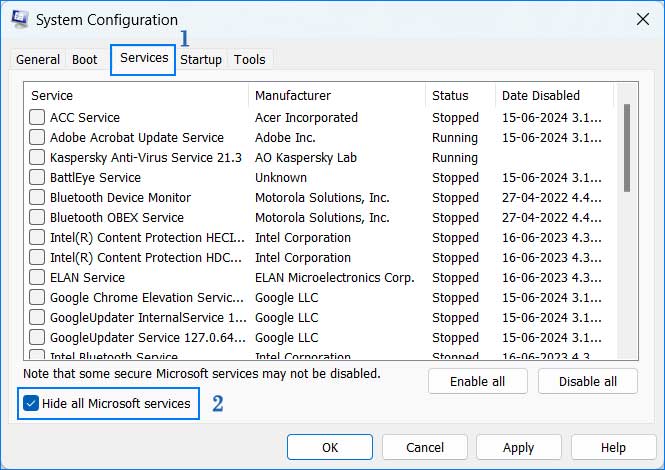
- Open System Configuration setting. Search for msconfig in start menu and open System Configuration. additionally, you can also type
msconfigin Run dialog box and open it.

- Go to Services tab. Select “Hide all Microsoft services“
- Click on the “Disable all” button to unselect all the services.
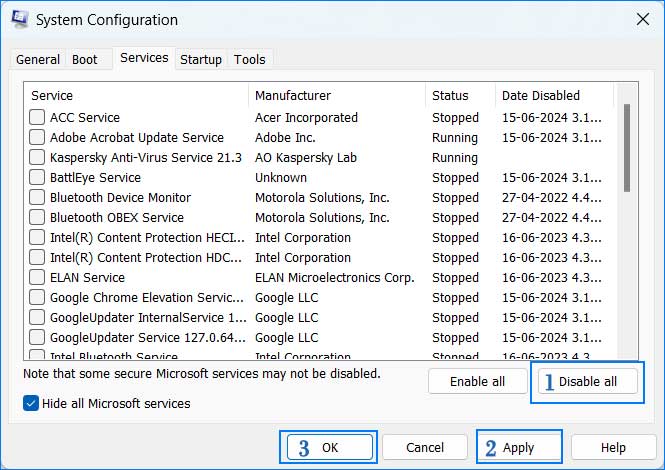
Click on “Apply” button.
Step 2: Disable Startup items.
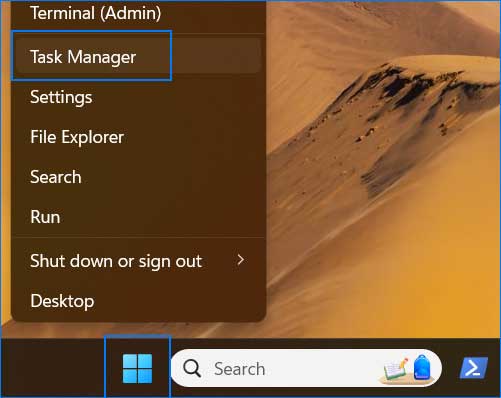
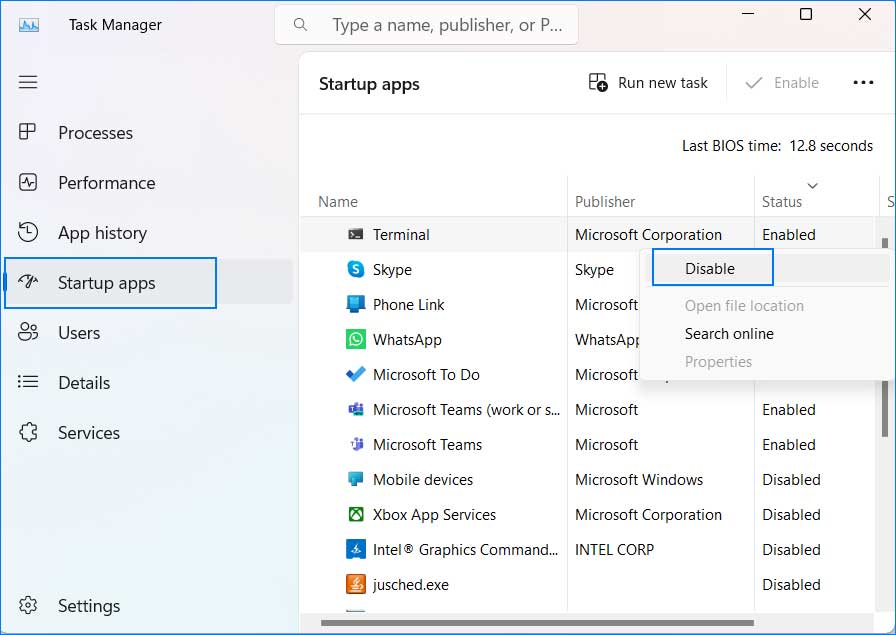
- Open Task Manager and click on the Startup apps.
- Right click on each enabled apps and select “Disable“.
Step 3: Reboot PC.
Solution 5: Download and Install Update manually
If you are getting this error when installing some particular KB update package, you can install those package manually. Go to the Microsoft catalog page, search for the KB file and download it.
Step 1: Open Microsoft Catalog.
https://www.catalog.update.microsoft.com/Home.aspx
Step 2: Search for your Update package. Ex. KB5037849
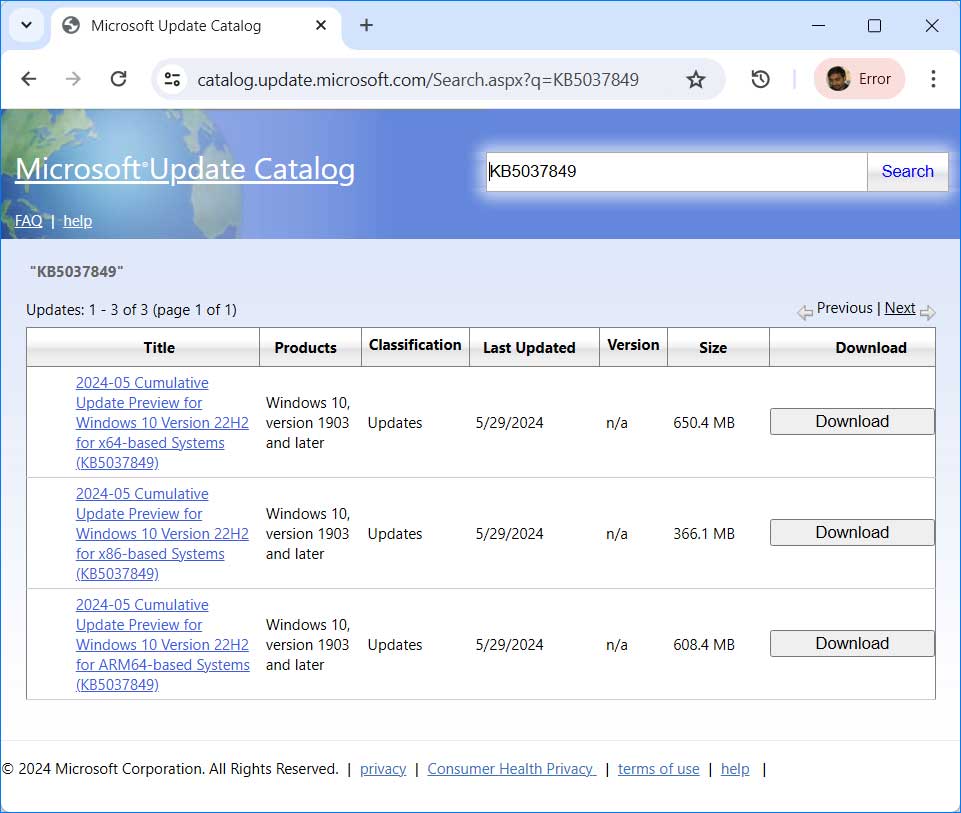
Step 3: Download the package according to your PC configuration and install it.
Solution 6: Run SFC and DISM command to repair corrupted Windows files
Corrupted or missing Windows files are also the big reason behind any Windows errors including the update error 0x80070103. You must scan and fix any corrupted or missing system files issues by running the SFC and DISM command.
SFC Command
Step 1: Open Admin Command Prompt.
Step 2: Execute the command.
C:\Windows\System32> sfc /scannow

Beginning system scan.  This process will take some time.

Beginning verification phase of system scan.
Verification 100% complete.

Windows Resource Protection found corrupt files but was unable to fix some of them. Details are included in the CBS.Log windir\Logs\CBS\CBS.log. For example C:\Windows\Logs\CBS\CBS.log.

C:\Windows\System32>
Step 3: Reboot your PC.
DISM Commands
Step 1: Open elevated Command Prompt.
Step 2: Execute the following commands in sequence.
1. DISM – Check Health
C:\Windows\System32> dism /Online /Cleanup-Image /CheckHealth

Deployment Image Servicing and Management tool
Version: 10.0.22621.2792

Image Version: 10.0.22631.3737

No component store corruption detected.
The operation completed successfully.
2. DISM – Scan Health
C:\Windows\System32> dism /Online /Cleanup-Image /ScanHealth

Deployment Image Servicing and Management tool
Version: 10.0.22621.2792

Image Version: 10.0.22631.3737

[==========================100.0%==========================]

No component store corruption detected.
The operation completed successfully.

C:\Windows\System32>
3. DISM – Restore Health
C:\Windows\System32> dism /Online /Cleanup-Image /RestoreHealth

Deployment Image Servicing and Management tool
Version: 10.0.22621.2792

Image Version: 10.0.22631.3737

[==========================100.0%==========================]

The restore operation completed successfully.
The operation completed successfully.

C:\Windows\System32>
Step 3: It will take some time to finish the process so keep patience and let the process completes.
Solution 7: Use Get Help section to resolve the issue.
Windows 11/10 provides Get Help section to resolve Windows issues. You can use this section to find the cause of this problem and solve them automatically.
- Click on the Start menu and Search for “Get Help” and open it.
- Search for “driver update error 0x80070103”.
- Here you will get some information about how to fix this error. It will also ask you consent to run troubleshooter. Click on Yes button to run the troubleshooter.
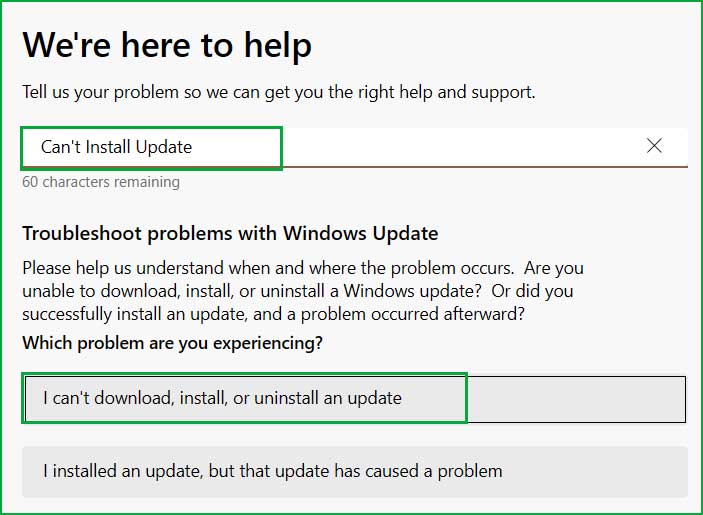
- Follow the onscreen instruction and resolve this issue.
Intel Graphics Driver Installation Error 0x80070103
Most of the users complained that they get error code 0x80070103 when installing or updating the Intel Graphics driver. It says that Graphics driver version update is already installed in the system.
Step 1: Uninstall the existing Intel® Driver & Support Assistant tool. To uninstall it, download the Intel® Driver & Support Assistant Uninstaller.
Step 2: Restart your system.
Step 3: Now, download and install the latest Intel® Driver & Support Assistant version.
https://www.intel.com/content/www/us/en/support/detect.html
Conclusion
The driver’s install error 0x80070103 occurs when system detected that newer version of driver is already installed on your computer. There are multiple ways to fix this error such as hiding the problematic updates, re-installing the updates, clearing Windows update cache, running sfc and dism commands, etc.